How to test the integration
This documentation describes how to test your CloudCore API and CloudSignal integrations.
Preparations
Before the testing can start a few configurations have to be in place, each described here.
CloudCore API Interface
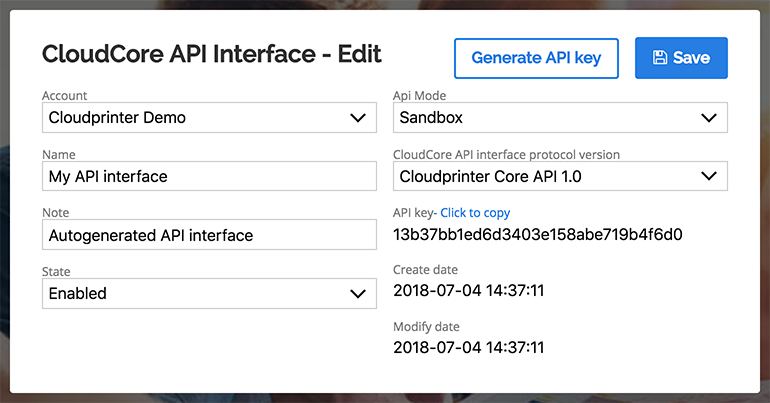
Create a CloudCore API Interface - This is the core interface for all order and quote requests. It provides you with a unique API key, which links the order to the specific account.
Login to the admin dashboard and go to 'CloudCore API Interfaces'. We already created one for you when you created the Cloudprinter.com account, you just need to get the API key from there.
Here is how it looks: 
CloudSignal Webhooks
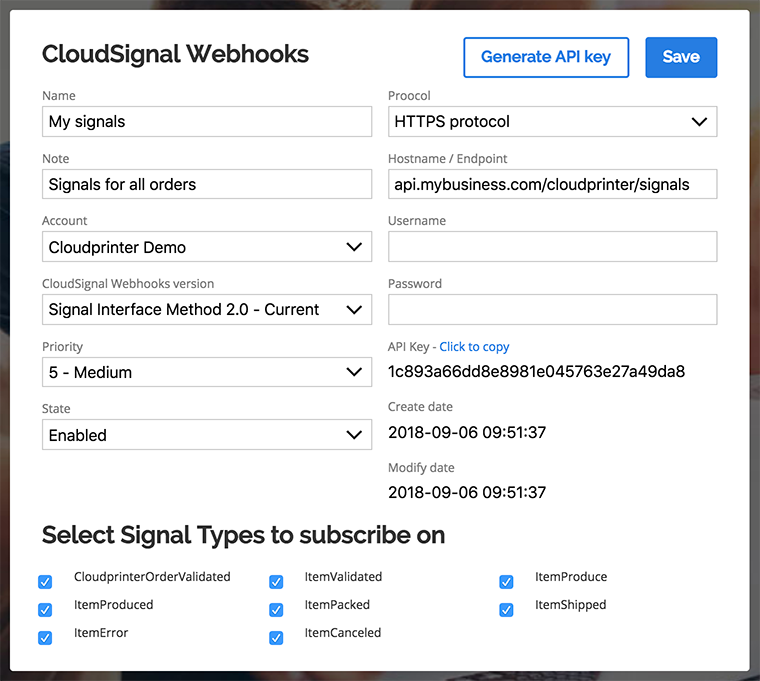
Create a CloudSignal Webhooks - This is the configuration for the service for sending signals back to your system. When you create a new webhooks configuration you choose which signal types you want to subscribe on.
The configuration page looks like this:

There are a few points to note:
- A signal endpoint in your system must be exposed to Cloudprinters system
- Access limitation can be added on IP level on your endpoint - More information here
- The API key provided on the CloudSignal Webhooks must be validated at your signal endpoint.
Sandbox mode
Having a CloudCore API Interface in Sandbox mode makes the integration tests easier. Here are a few of the reasons:
- Orders are not pushed to any printer, but otherwise processed the same way in the Cloudprinter.com system.
- Printer signals are generated to simulate that the order was printed and shipped.
- Sandbox orders are free.
Posting the first order
You now have setup all the basic elements needed to post the first Sandbox order. We often see that developers start with Postman or cURL to get the first order through. That is also perfectly fine and makes it easiest for you. This is all about getting the first order accepted by the API.
The JSON to post to the Cloudprinter Core API is documented here - Cloudprinter Core API
A few of the common issues to check if the order was not accepted:
- Correct API key? If not a 401 HTTP status is returned.
- Content type set to 'application/json'? If not the API will not parse it as JSON.
- Raw data in the body? The raw JSON should be in the body of the request, no form-data, binary etc.
- Is the structure of the JSON valid? A HTTP status code 400 or 500 could be returned here.
- Check the response of the request, for most errors with HTTP status code 400 an error and info text are returned to help you debug.
When you get a HTTP status code 201 back the order has been created. You can go to the admin dashboard and see the order as well. Do a number of these test orders to get more familiar with the Cloudprinter Core API.
Receiving the first signal
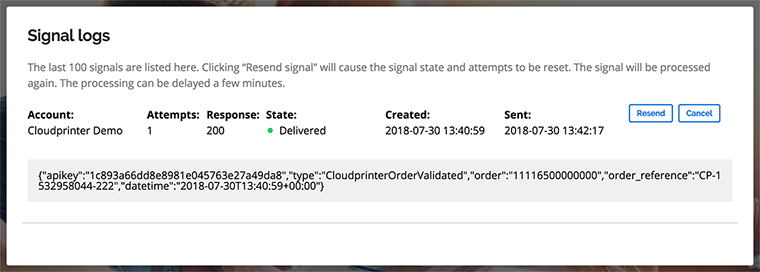
For each order that gets processed, a number of signals are generated. You can follow the latest signals in the admin dashboard under "CloudSignal Webhooks" and "Logs" in the menu.
Signal logs look like this: 
Each of the fields are described here:
| Field | Description |
|---|---|
| Account | The name of the account the signal belongs to |
| Attempts | The number of delivery attempts the Cloudprinter.com system has made |
| Response | The HTTP response code from your signal endpoint on the latest delivery attempt |
| State | A textual description of the state the signal is in |
| Created | Date and time when the signal was created |
| Sent | Date and time when the signal was delivered successfully |
For each signal you can Cancel or Resend:
- Resend will reset the attempts counter and the state of the signal and the signal sender will pick it up shortly.
- Cancel can be used to cancel a signal that your system can not accept e.g. the order reference and the item reference do not match.
If you didn't receive the signals in the first attempt, the CloudSignal sender service will push the signal again. 100 attempts will be made before giving up. The time between attempts will be increase after each attempt.
Testing checklist
Cloudprinter.com has a predefined test checklist we recommend all clients to follow. It ensure that all aspects of the integration are tested in an easy and structured way.
Preconditions:
- CloudCore API Interface in Sandbox mode
- CloudSignal Webhooks configuration
- Signal endpoint in your system
- Order files are available via HTTPS
Standard test cases:
| Step | Description |
|---|---|
| 1 | Check configurations, make sure you have a CloudCore API Interface with mode set to Sandbox. Make sure you have a CloudSignal Webhooks configuration. |
| 2 | Post a regular book order if you support books. Specify required options, like paper type and total pages. Use the shipping level cp_postal. Check that the order is accepted by the API and that you can see it in the admin panel. |
| 3 | Signals for the step 2 order will be generated when the order is getting processed. This starts normally within a few minutes. The signals are pushed to the configured CloudSignal Webhooks. Check the delivery status of the signals in your own system, and check the CloudSignals Logs in the admin dashboard. The signals must be delivered to your system and be in state "Delivered" in the log. |
| 4 | Post a multi item order with minimum of 2 items. Check that the order was accepted by the API and that signals was created and pushed to your system. |
| 5 | Post a reorder, meaning a regular order with reorder information on the item level. Make reference back to a one of the previous orders, set the reorder cause and reorder description. See more information on reorders here. |
| 6 | Post orders with products of all different product categories you support. As with the previous tests make check the status of the order and signals in the admin dashboard. |
| 7 | Failed order post handling - Set an invalid product reference and post the order. The result will be a HTTP status response 400. Your system must check on the HTTP response code and in cases where HTTP status code 201 is not returned your system must handle that. We suggest to raise an alarm. If a HTTP status 5xx was returned, Cloudprinter has a temporary issue and order post must be retried. |
Optional test cases:
| Step | Description |
|---|---|
| A | Request a product list. This step is optional as the product and option reference codes can be found in the admin dashboard. |
| B | Request product details. This step is optional as detailed information on the products can be found in the admin dashboard. Product details provide detailed information on the product, available options and pricing. |
| C | Request an order quote with one item. The quote request will return the order price and shipping options. Check that the order is accepted by the API. See quote docs here |
| D | Post an order with the quote hash from one of the shipping options in step 10. No shipping level should be specified as that is included in the shipping hash. |
| E | Request an order list to get the status for the last placed orders. |
Go live
Before you can go live you have to complete the setup of your account, so we know your invoice information, subscription mode, payment information etc.
Business information
In the admin panel under 'My Organization' and 'Organization' you can edit your basic organization data. Make sure your basic company information is correct and that the invoicing information has been set.
Payment setup
In the admin panel under 'My Organization' and 'Payment' you can setup the payment for the products/services we provide. When setting up the credit card information your monthly subscription will also start. Both the subscription fee and the product/service cost are charged on this same credit card.
Account name
The name of your account is used by default as the sender name (consignor) on the shipping label of your orders. Set the account name so it reflects the brand the end-customers knows. The account name is updated under 'My Organization' and 'Accounts'.
First live order
Change the mode on the CloudCore API Interface to Live mode and place a real payed order for end-to-end delivery test. Remember to set a real address this time, as the order will be produced and shipped to this address.